Showing posts with label residential design. Show all posts

Wednesday, October 29, 2014

From Dark to Dreamy: a Modest Kitchen Makeover with Bold Results

Stained wood can add charm, warmth and richness to our homes, but it requires a certain level of balance to prevent it from becoming overwhelming, dark or oppressive.  The balance in this project had yet to be achieved, but there were elements worth saving that would help transform the space from dark to dreamy...


Stained floors, ceilings and cabinets coupled with dark red walls made the space feel tight and outdated.


While a small island formed an obstacle that interrupted the flow and function of the kitchen and didn't provide a large enough prep surface.


The dual loaded galley style kitchen with center island created a bisected space with narrow working aisles leaving the eating area underutilized and inefficient.


The existing kitchen plan had tight circulation clearances and limited work surface.  Foot traffic from the Foyer flowed directly through the working area and in front of the often used refrigerator.  It was not conducive to entertaining or accommodating for multiple cooks.  The breakfast table was not needed, but better access to the dining room was.


The new design keeps the flow of traffic outside of the kitchen working area allowing us to eliminate the cabinetry on one side of the kitchen to increase aisle clearances, provide an open area in front of the refrigerator and improve the overall function of the kitchen.  Enlarging the opening to the Dining room creates connection to this previously separated space and makes entertaining an ease.  The long island provides ample work surface and a casual dining area.


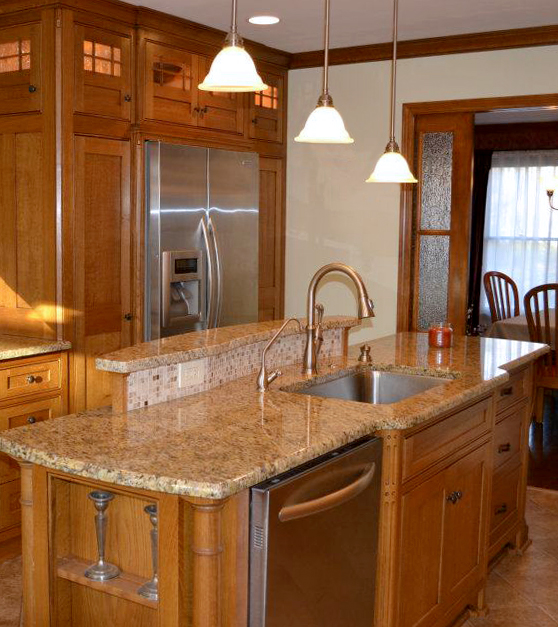
The renovated kitchen is bright and beautiful.  We preserved the stained wood floors, kept the wood ceiling and lightened it with paint, replaced the cabinetry with a balanced combination of stained and painted cabinets and upgraded the counters and appliances.  The sink and range were left in their original positions to reduce cost, but they are integrated into the new design with such skill that they appear as if they are meant to be.


The elongated island provides separation between the working and entertaining areas of the space and provides a wonderful wide work surface with under counter storage accessible from each side.


The new pantry cabinets and dry bar provide ample and efficient storage space and beautifully anchor the end of the kitchen.


The gas range frees up space previously occupied by a wall oven and has an under counter microwave conveniently located next to it.  The counter-depth refrigerator looks sleek and stylish, but it is also very functional because it doesn't protrude into the working aisle.


A prep sink located in the island with a flanking trash drawer creates the ultimate chopping and prep area.


New lighting and thoughtful details bring the space to life adding visual appeal and decorative highlights.


 New granite countertops with a radiused edge add to the beauty of the space and provide a durable work surface ideal for an active family.  

This new design provides the homeowner with a kitchen they love and an entertaining space that works for large and small groups every day of the week.  We were able to transform this dark space into a dreamy kitchen full of light and loveliness.


Monday, January 28, 2013

Finding Online Design Inspiration


There are things about our homes that drive us crazy.  No matter what makes us long for a change eventually we decide to do something about it.  And so we fire up our computers and we become ensnared in the endless array of images, ads and blogs.  We become overwhelmed at the possibilities.

Don't be discouraged.  There is an online resource designed for homeowners who want to find inspiration, images or a trusted local professional to lead them on their way.  This place is called Houzz.comHouzz features the largest residential design database in the world, articles written by design experts, product recommendations, a vibrant community powered by social tools, and information on more than 1.5 million remodeling and design professionals worldwide who can help turn ideas into reality.

I use houzz.com for inspiration.  I use it to share images with my clients, to provide visual examples of proposed design elements and to showcase my own professional designs.  In fact, I recently received the “Best Of Houzz” 2013 Customer Satisfaction award which is based on homeowner members who rated their experience working with remodeling professionals in 12 categories ranging from architects, and interior designers to contractors and other residential remodeling professionals.
I am honored to receive this award because I firmly believe that the true measure of a successful design can only be found in the satisfaction of an appreciative client and this award affirms my dedication to providing my clients with creative design solutions and superior service.  There is nothing more rewarding than hearing the praise of a client who says they love their new home more than they ever imagined.  

The five star reviews I received from my clients were sent directly from the client to Houzz.com where they undergo a confirmation process.  I was unaware of the reviews until Houzz notified me by email.  The reviews are authentic and can be trusted.

So when you decide to dive into cyberspace for some design inspiration, make sure you choose the path of least resistance and begin with trusted resources like Houzz.com and KustomHomeDesign.com.


Thursday, January 3, 2013

NEW YEAR'S RENOVATIONS...TOP 10 RENOVATION PROJECT TYPES


Each year when families across the country retire their old scribbled and marked upon calendars with fresh new ones full of promise and empty spaces to be filled, they begin to dream of ways to improve the way they live and increase the pleasure they receive.  One of the most obvious places they turn to is their own home, the place where they spend the majority of their time.

So it is that we look back at 2012 and ahead to 2013.  Looking back, it is easy to see that remodeling trends continue to evolve and that homeowners are gaining renewed confidence and channeling that energy back into their homes.  According to the National Association of Home Builders (NHAB) there were many projects homeowners chose to undertake, but there were a few common project types that were repeated time and again.  Below is a ranking of the Top Ten Remodeling Projects in descending order:

#10      SIDING 

Improvements to or replacement of exterior siding was the 10th most common renovation project.

#9        ROOFING 

Replacement of a home’s roofing was the 9th most common renovation project.

#8        FINISHED BASEMENT

Finishing an existing basement to gain useable heated and conditioned space within a home without adding on was the 8th most common renovation project.

#7        MINOR REPAIRS

Minor repairs to homes typically resulting from normal wear and tear was the 7th most common renovation project.

            #6        ROOM ADDITIONS

The addition of a new room to an existing home was the 6th most common renovation project.

            #5        WHOLE HOUSE REMODELING

Renovating an entire house at one time was the 5th most common renovation project.

            #4        REPAIRING PROPERTY DAMAGE

Repairing a home due to property damage caused by either man-made or natural disasters such as Hurricane Sandy was the 4th most common renovation project.

             #3       WINDOW AND/OR DOOR REPLACEMENT

Replacement of windows and doors, typically to increase energy efficiency, remains one of the most common renovation project types.  Unfortunately, this trend will continue to top the list since many builders install sub par windows in new homes to save money.

#2        KITCHEN REMODELING

Renovating a kitchen remains one of the most popular project types.  It was the #1 project type until 2009.

#1        BATHROOM REMODELING

Renovating an existing bathroom has fast become the #1 renovation project type with master bathroom renovations leading the list on homeowner’s wish lists.


If you are interested in starting a home renovation project during 2013, but you don't know where to start, gives me a call.  Kustom Home Design has been helping homeowners realize the true potential of their home for 20 years.  Happy New Year everyone!

Thursday, September 20, 2012

Residential Design: Where to Start and How to Proceed

You've decided you're ready to pursue that renovation or new building project that you've been thinking about for so long now, but you don't know where to begin or what to expect. Delving into the unknown can make us apprehensive and anxious, so here is some helpful information to prepare you for what to expect and to provide you with some direction along the way.

Like most things in life, a renovation and new home project requires some planning. The first step in the process should be to locate and interview residential designers or architects. These are the professionals who will help you bring your vision to life. Starting with a design professional will enable you to organize and develop your thoughts, needs, desires, and budget. You will walk away from the design process with the documents you need to successfully solicit comparable bids from contractors which will give you better pricing and result in a faster construction time and fewer change orders.

What does a residential designer or residential architect really do?

There are five basic phases to the home design process:
1. Programming
2. Schematic Design
3. Design Development
4. Design Documents
5. Construction Administration

Programming: During this phase the designer will meet with you to determine your wants, needs, and desires. A quality designer will ask you seemingly unimportant questions about your lifestyle, your priorities, your current and future needs and will want to learn about your personal character and style. Be prepared to explain what you like and dislike about your current home, be specific. Designers and architects are trained problem solvers, but they can't read your mind, so tell them what problems you are having in your current home or have had in other homes. Prepare a prioritized list of desired changes, in the case of a renovation, and a prioritized list of desired rooms or spaces, in the case of a new home. Try to determine what the reasons are for wanting to renovate or build in the first place. Perhaps you need more space, better flow between rooms, more natural light, improved function or more storage. Let the designer learn about you and what you need so they can successfully transform those needs and desires in a unique design solution. If you are beginning a renovation project, the designer will visit the site and take measurements of the existing home as they relate to the area to be renovated. If you are building a new home the designer will want to visit the site and document existing site conditions during this phase.

Schematic Design: During this phase the designer will use all of the information gathered in the programming phase to develop multiple design solutions. They will meet with you to review their designs and will want to get your feedback. Be honest with your designer. If you do not like the solutions they have presented, tell them so and more importantly, tell them why. Most likely you will like bits and pieces from each of the designs. The designer will revise the plans and elevations based on your comments and will meet with you again to review the new designs. This process will continue until you have a design solution that meets all of your needs and desires.

Design Development: During this phase, the designer will continue to develop the project based on the approved schematic design from the previous phase. They will begin to work out details, and refine what materials will be used and get more in depth with you about the appliances, plumbing fixtures, light fixtures, mechanical systems and more. If your designer does not suggest it, you may want to request that the designer prepare a preliminary set of floor plans, exterior elevations, and an outline specification to use for preliminary pricing purposes. A reputable contractor will give you a preliminary estimate based on these early documents to confirm that the design is on target with your budget. The preliminary pricing at this stage may help you avoid costly design changes during the design document phase. The further along you advance in the design process and decide to make changes to the project, the more it will cost you in design fees. However, with that being said, it will always cost you more to make changes during construction than it will to make changes during any part of the design process. Once the design is further developed and you are happy with the results, the designer will begin the design documents phase.

Design Documents: This is phase where the designer will produce the documents necessary for the contractor to build the project. The amount of information contained in your design documents will depend on the level of documentation you request from your designer.  Smaller scale or less complex designs may only require a basic set of design documents that include a floor plan with notes and dimensions, an exterior elevation showing the outside appearance of the home with notes and dimensions, and a site plan locating the home on the site. While a more complex or larger scale project would require an expanded set of design documents which can include the same floor plans, elevations, and site plan mentioned above along with wall sections which define the materials and limited methods of construction for the floors, walls, and roof; and building sections illustrating the connection between new and existing structures and any significant areas of the project where the contractor needs to be given additional information.  Expanded sets can also include a finish schedule listing all of the finish materials, moldings, cabinetry, and counter tops for each room; interior elevations illustrating the designs of all the cabinetry, handrails, stairways, and moldings throughout the home along with notes and dimensions; and specifications which are written instructions concerning all of the materials to be used inside and outside the home. The more information you provide your contractor with, the less likely you are to have problems during construction.  Some contractors will tell that they don't need any drawings or that they only need a floor plan. You are putting yourself and your home at risk if you proceed without documentation or with minimal documents. If you plan on soliciting bids from multiple contractors, an expanded set of construction documents will ensure that each contractor is bidding on the same thing and you will receive competitive prices that are far less likely to change during construction.  An expanded set of documents will cost you more in design fees initially, but it will save you time and money in the long run.

Construction Administration: This phase is optional in the residential industry, but it is recommended if you have limited time to contribute to the oversight of the construction. During construction administration, the designer will visit the job site at intervals relative to the phase of construction to make sure the project is being built as intended. The designer will not conduct inspections, code officials will need to be called in to inspect the project for code compliance at the various stages. If there is a problem or you would like to make a change, the designer should be asked to be involved in the resolution or redesign. Construction is the longest phase of the process and having a designer who can act as your personal advocate from start to finish will make your home and you life much better.

Obviously, this is a lot of information and I have only explained the basics of each phase, but hopefully I have provided you with a guide that gives you a better understanding of and appreciation for the design process. As always, questions and comments are encouraged.  If you want more information, leave a comment on the blog or refer to my contact tab at the top of the page.